Cody O'Cain: Difference between revisions
No edit summary |
m (→Projects) |
||
| (29 intermediate revisions by one other user not shown) | |||
| Line 1: | Line 1: | ||
[[File: | [[File:Cody2.jpg|260px]] | ||
| Line 13: | Line 13: | ||
==Profile== | ==Profile== | ||
==Bio== | ===Bio=== | ||
I'm a Senior in Biomedical Engineering who is passionate about product development, finite element analysis, and | I'm a Senior in Biomedical Engineering who is passionate about product development, finite element analysis, patient specific medicine, and biomechanics. The MakerSpace has been a great place for myself, and I encourage anyone reading this to come by and explore! Working in a space open to all students produces ideas that would be impossible in major specific groups, and this open environment has allowed me to learn many new, interesting skills. My current personal focus is translating MRI / CT files into patient specific mesh files to be used for finite element study, and 3D printing. I also look for new methods and tricks that can be used to create a broader range of designs with greater complexity from the laser cutters, 3D printer, and PCNC mill here in the MakerSpace. | ||
==Projects== | ===Projects=== | ||
*'''Replicating Human Hand Motion''' | *'''Replicating Human Hand Motion''' | ||
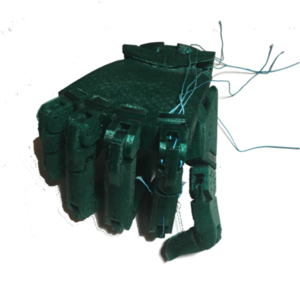
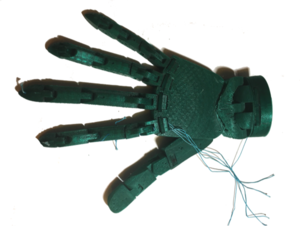
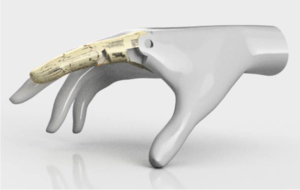
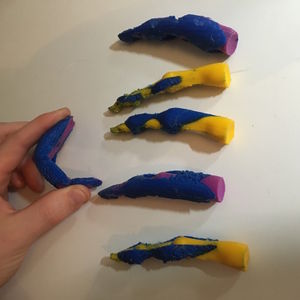
This project is a personal one of mine that I'm really passionate about. I find prosthetics to be a fascinating field, and it also plays into my interest in patient specific treatment. The idea behind the project is pretty simply, I used reference book and experience from the Cadaver Lab here at Tulane to tried and recreate the motion of the human hand. I tried an initial prototype which succeed in some respects, but failed in others. At the same time, I experiment with elastomers to try and replicate the range of motion and stability ligaments offer in vivo. This gave some surprisingly good results in terms of range of motion, but the plastic-elastomer contact required a large amount of force to overcome. In-vivo synovial fluid cuts the friction between bone and ligament, and to replicate such a system will likely need a similar type of lubrication. In regards to the renderings of the second prototype seen below I started looking at patient specific geometry. I first obtained a 3D scan of a my hand, and then smoothed out the mesh before transforming it into an editable mesh body in CAD. The idea behind this would be to have someone who needs a prosthetic to first scan their hand so that one can be produced that is spatially appropriate for their body. Currently I am attempting to make the model parameter run so that different scan can be imported and processed into assemblies that are capable of articulating properly. | |||
<div><ul> | <div><ul> | ||
<li style="display: inline-block;"> [[File:Pros 1.png|thumb|none|300px|First prototype after printing (closed)]] </li> | <li style="display: inline-block;"> [[File:Pros 1.png|thumb|none|300px|First prototype after printing (closed)]] </li> | ||
<li style="display: inline-block;"> [[File:Pros 2.png|thumb|none|300px|First prototype after printing (open) ]] </li> | <li style="display: inline-block;"> [[File:Pros 2.png|thumb|none|300px|First prototype after printing (open) ]] </li> | ||
<li style="display: inline-block;"> [[File:Pros 3.png|thumb|none|300px| | <li style="display: inline-block;"> [[File:Pros 3.png|thumb|none|300px|Rendering of second prototype in development (closed) ]] </li> | ||
<li style="display: inline-block;"> [[File:Pros 4.png|thumb|none|300px| | <li style="display: inline-block;"> [[File:Pros 4.png|thumb|none|300px|Rendering of second prototype with possible elastomer ('skin") covering (open) ]] </li> | ||
<li style="display: inline-block;"> [[File:PROS 5.JPG|thumb|none|300px|Prototyping with elastomer material for flexible joint movement ]] </li> | <li style="display: inline-block;"> [[File:PROS 5.JPG|thumb|none|300px|Prototyping with elastomer material for flexible joint movement ]] </li> | ||
</ul></div> | |||
*'''Biaxial Device''' | *'''Biaxial Device''' | ||
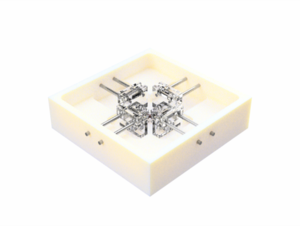
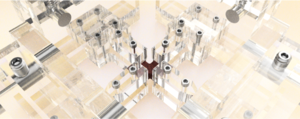
When I joined the BG&R Lab here at Tulane we were in the process of constructing a planar biaxial device that can be used to collect more characteristic data of tissue samples compared to uniaxial testing. These renders were used in the grant that procured funding for the device to be built. | |||
<div><ul> | |||
<li style="display: inline-block;"> [[File:Biax 1.png|thumb|none|300px|Rendering of biaxial device for tissue testing]] </li> | <li style="display: inline-block;"> [[File:Biax 1.png|thumb|none|300px|Rendering of biaxial device for tissue testing]] </li> | ||
<li style="display: inline-block;"> [[File:Biax 2.png|thumb|none|300px|Rendered top view of small tissue sample in device]] </li> | <li style="display: inline-block;"> [[File:Biax 2.png|thumb|none|300px|Rendered top view of small tissue sample in device]] </li> | ||
<li style="display: inline-block;"> [[File:Biax 3.png|thumb|none|300px|Rendered side view of tissue in configuration for testing]] </li> | <li style="display: inline-block;"> [[File:Biax 3.png|thumb|none|300px|Rendered side view of tissue in configuration for testing]] </li> | ||
</ul></div> | |||
*'''Sound Stand''' | |||
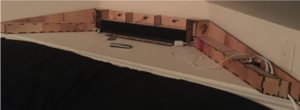
I currently live in an old apartment which has a lot of slanting (almost collapsing) walls. This quickly became a problem because square objects wouldn't fit in corners, so to fix this issue I design a "sound stand" to hold my sound bar while also hiding some wiring for the room. I broke down the CAD model into a folder of .dxf files, and cut the pieces out of plywood on a laser cutter in the MakerSpace. A little assembly and it was ready to go. | |||
<div><ul> | |||
<li style="display: inline-block;"> [[File:Sound R.png|thumb|none|300px|Sound stand rendering in Fusion 360]] </li> | |||
<li style="display: inline-block;"> [[File:Sound P.png|thumb|none|300px|Sound stand after being laser cut and assembled]] </li> | |||
</ul></div> | |||
*'''Drawers''' | |||
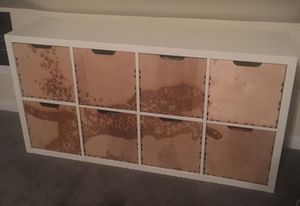
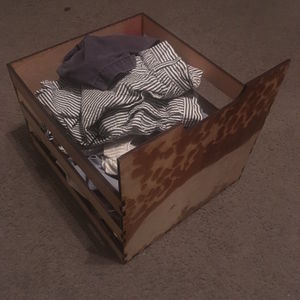
A similar apartment project. I owned a shelf unit from IKEA and planned on using it to hold clothes. However, clothes continued to fall out the cubbies and it just didn't look good. So, I made a quick drawer design, cut out the pieces, glued them together, and added a design to the front. Side-note, a lot of small temporary furniture, such as drawers, can be made using the MakerSpace. | |||
<div><ul> | |||
<li style="display: inline-block;"> [[File:CubbF.JPG|thumb|none|300px|All eight drawers in place]] </li> | |||
<li style="display: inline-block;"> [[File:CubbS.JPG|thumb|none|300px|One of the drawers. I used strips of wood instead of panels to cut down on material]] </li> | |||
</ul></div> | |||
*'''Automated Silly String''' | |||
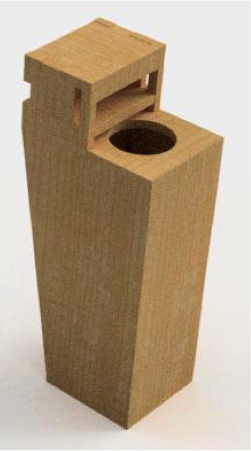
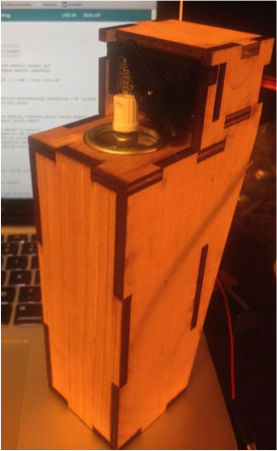
I took an embedded design class my junior year at Tulane ( If you're a Tulane student, I highly recommend you take this class) and this was the result of the Halloween project. My partner (Keith Watza) and I design this box to hold a stepper motor and a silly string canister. Once we assembled a few of them we wired the stepper to a motion detectors and placed them inside jack-o-lanterns. Then we placed them outside, where they surprised people walking by. | |||
<div><ul> | |||
<li style="display: inline-block;"> [[File:Silly R.png|thumb|none|300px|Silly String holder design]] </li> | |||
<li style="display: inline-block;"> [[File:Silly P.png|thumb|none|300px|Silly String holder in use]] </li> | |||
</ul></div> | |||
*'''Fixing Sink''' | |||
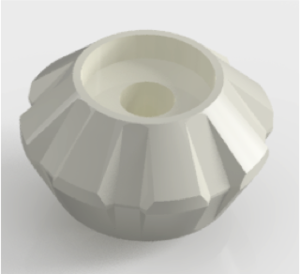
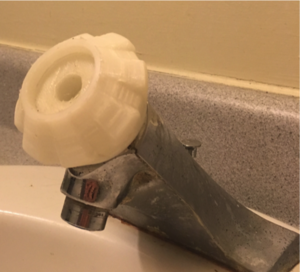
For one reason or another, the knob to our sink broke in our apartment. We attempted to buy a new one, but due to the age of our apartment none of the standard sizes fit our sink. So, instead of ordering an obscure sized sink knob, I reconstructed the knob from its broken pieces, and printed it out of Nylon. It lasted for about six month until our landlord replaced all the sinks in the apartment. It was probably for the best. | |||
<div><ul> | |||
<li style="display: inline-block;"> [[File:Sink R.png|thumb|none|300px|Sink Knob rendering in Fusion 360]] </li> | |||
<li style="display: inline-block;"> [[File:Sink P.png|thumb|none|300px|Sink Knob after being 3D printed in Nylon]] </li> | |||
</ul></div> | |||
*'''Acrylic Work''' | |||
<div><ul> | |||
<li style="display: inline-block;"> [[File:DiskS.JPG|thumb|none|300px|Layered spray-paint image on acrylic ]] </li> | |||
</ul></div> | |||
===Skills:=== | ===Skills:=== | ||
| Line 46: | Line 88: | ||
*3d Design - [[Solidworks]], [[AutoDesk Fusion 360]], [[AutoDesk MeshMixer]], [[Cura]], [[AutoDesk 123D Make]], [[Memento]], [[MeshLab]] | *3d Design - [[Solidworks]], [[AutoDesk Fusion 360]], [[AutoDesk MeshMixer]], [[Cura]], [[AutoDesk 123D Make]], [[Memento]], [[MeshLab]] | ||
* | *Graphics - [[Adobe Illustrator]], [[CorelDraw]], [[Photoshop]] | ||
*Finite Element Method / Segmentation - [[FEBio]], [[Abaqus]], [[Seg3D]], [[OsiriX]] | *Finite Element Method / Segmentation - [[FEBio]], [[Abaqus]], [[Seg3D]], [[OsiriX]] | ||
*Programming - [[ | *Programming - [[C++]], [[Matlab]], [[Maple]] | ||
Latest revision as of 14:14, 1 December 2016
MakerSpace Ninja
Email: cocain@tulane.edu
Phone: (504) 756-9173
Major: Biomedical Engineering
Profile
Bio
I'm a Senior in Biomedical Engineering who is passionate about product development, finite element analysis, patient specific medicine, and biomechanics. The MakerSpace has been a great place for myself, and I encourage anyone reading this to come by and explore! Working in a space open to all students produces ideas that would be impossible in major specific groups, and this open environment has allowed me to learn many new, interesting skills. My current personal focus is translating MRI / CT files into patient specific mesh files to be used for finite element study, and 3D printing. I also look for new methods and tricks that can be used to create a broader range of designs with greater complexity from the laser cutters, 3D printer, and PCNC mill here in the MakerSpace.
Projects
- Replicating Human Hand Motion
This project is a personal one of mine that I'm really passionate about. I find prosthetics to be a fascinating field, and it also plays into my interest in patient specific treatment. The idea behind the project is pretty simply, I used reference book and experience from the Cadaver Lab here at Tulane to tried and recreate the motion of the human hand. I tried an initial prototype which succeed in some respects, but failed in others. At the same time, I experiment with elastomers to try and replicate the range of motion and stability ligaments offer in vivo. This gave some surprisingly good results in terms of range of motion, but the plastic-elastomer contact required a large amount of force to overcome. In-vivo synovial fluid cuts the friction between bone and ligament, and to replicate such a system will likely need a similar type of lubrication. In regards to the renderings of the second prototype seen below I started looking at patient specific geometry. I first obtained a 3D scan of a my hand, and then smoothed out the mesh before transforming it into an editable mesh body in CAD. The idea behind this would be to have someone who needs a prosthetic to first scan their hand so that one can be produced that is spatially appropriate for their body. Currently I am attempting to make the model parameter run so that different scan can be imported and processed into assemblies that are capable of articulating properly.
- Biaxial Device
When I joined the BG&R Lab here at Tulane we were in the process of constructing a planar biaxial device that can be used to collect more characteristic data of tissue samples compared to uniaxial testing. These renders were used in the grant that procured funding for the device to be built.
- Sound Stand
I currently live in an old apartment which has a lot of slanting (almost collapsing) walls. This quickly became a problem because square objects wouldn't fit in corners, so to fix this issue I design a "sound stand" to hold my sound bar while also hiding some wiring for the room. I broke down the CAD model into a folder of .dxf files, and cut the pieces out of plywood on a laser cutter in the MakerSpace. A little assembly and it was ready to go.
- Drawers
A similar apartment project. I owned a shelf unit from IKEA and planned on using it to hold clothes. However, clothes continued to fall out the cubbies and it just didn't look good. So, I made a quick drawer design, cut out the pieces, glued them together, and added a design to the front. Side-note, a lot of small temporary furniture, such as drawers, can be made using the MakerSpace.
- Automated Silly String
I took an embedded design class my junior year at Tulane ( If you're a Tulane student, I highly recommend you take this class) and this was the result of the Halloween project. My partner (Keith Watza) and I design this box to hold a stepper motor and a silly string canister. Once we assembled a few of them we wired the stepper to a motion detectors and placed them inside jack-o-lanterns. Then we placed them outside, where they surprised people walking by.
- Fixing Sink
For one reason or another, the knob to our sink broke in our apartment. We attempted to buy a new one, but due to the age of our apartment none of the standard sizes fit our sink. So, instead of ordering an obscure sized sink knob, I reconstructed the knob from its broken pieces, and printed it out of Nylon. It lasted for about six month until our landlord replaced all the sinks in the apartment. It was probably for the best.
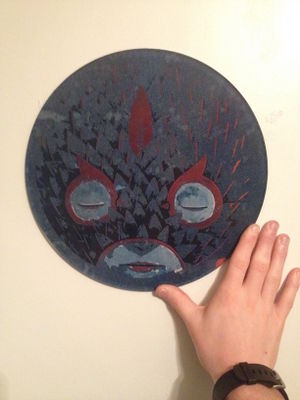
- Acrylic Work
Skills:
- 3D Printing
- Laser Cutter
- CNC Mill
- Analog Electronics
- Microcontrollers
- Basic Machine Skills
- 3d Design - Solidworks, AutoDesk Fusion 360, AutoDesk MeshMixer, Cura, AutoDesk 123D Make, Memento, MeshLab
- Graphics - Adobe Illustrator, CorelDraw, Photoshop

