Using the Laser Cutter: Difference between revisions
No edit summary |
No edit summary |
||
| Line 22: | Line 22: | ||
4. When the settings are complete, turn on the laser cutter and send the job to the laser cutter by simply clicking "Print". When you turn on the laser cutter it will automatically turn on the ventilation system as well. | 4. When the settings are complete, turn on the laser cutter and send the job to the laser cutter by simply clicking "Print". When you turn on the laser cutter it will automatically turn on the ventilation system as well. | ||
5. Lay your material on the bed of the laser cutter, keeping it as flat as possible. '''Maker sure your material is LASER SAFE''', some materials can damage the machine or release noxious fumes. There is an ongoing list of laser safe materials [[Laser Cutter Materials|here]]. | 5. Lay your material on the bed of the laser cutter, keeping it as flat as possible. '''Maker sure your material is [[Laser Cutter Materials|LASER SAFE]]''', some materials can damage the machine or release noxious fumes. There is an ongoing list of laser safe materials [[Laser Cutter Materials|here]]. | ||
6. Close the lid on the laser cutter and press the green "Go" button on the machine. | 6. Close the lid on the laser cutter and press the green "Go" button on the machine. | ||
Revision as of 07:06, 6 January 2017
Introduction


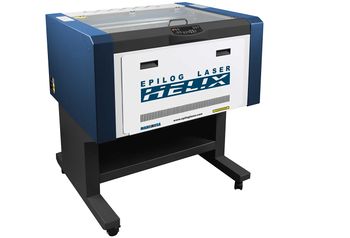
When designing for work with a laser cutter, there is only one major rule: Anything with a line-width of 0.001" (or "hairline") will be cut, everything else will be etched into the material. There are many types of vector drawing software that can be used, including Inkscape, CorelDraw, Adobe Illustrator, even Microsoft Powerpoint. This guide will focus on using the laser cutters themselves, rather than discussing the design aspects of vector software.
We do recommend that when designing your print, it should be laid out on a page that is 24" wide and 18" tall (the maximum dimensions of the laser cutters). This makes it much easier to tell the laser cutter where to locate the design on the cutting bed and greatly reduces errors in placement.
Get Started
1. Save your image as a .pdf. Some programs can print to the laser cutter without problems, but most cannot. The simplest means of avoiding any problems is to save your work as a .pdf file before attempting to print it.
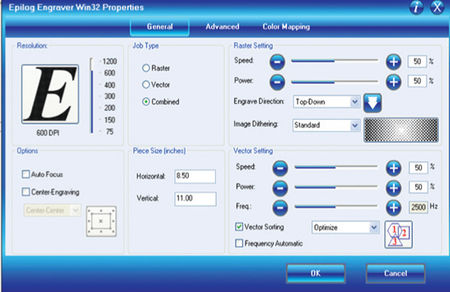
2. Open your .pdf file on the computer connected to the laser cutters, and select "File -> Print". Choose the correct machine that want to use from the drop-down menu and then click "Properties" A screen will pop-up that will allow you to adjust the settings for your machine.
3. There are many different settings on the print screen, but the only ones you really need to be concerned with are "Resolution", "Speed", and "Power":
- First decide whether you want the laser to "Vector" (cut), "Raster" (engrave), or "Both". Usually you can simply choose "Both", as the machine will know what to cut and what to engrave, however you may want to choose just one option in certain circumstances.
- Next set the "Resolution" for any engraved images. We usually recommend a resolution between 300dpi and 600dpi. Rarely is there a significant difference between 600dpi and 1200dpi, other than a 1200dpi image will take twice as long to engrave.
- Then you'll want to set your "Speed" and "Power" settings for both raster images and vector lines. These settings will generally depend on the material you are using, so you can use the recommended settings for each material as listed in the table by the computer. A similar table of recommendations can be found here.
- Finally, adjust the frequency setting of the laser, which can also be found in the table of speed/power settings.
4. When the settings are complete, turn on the laser cutter and send the job to the laser cutter by simply clicking "Print". When you turn on the laser cutter it will automatically turn on the ventilation system as well.
5. Lay your material on the bed of the laser cutter, keeping it as flat as possible. Maker sure your material is LASER SAFE, some materials can damage the machine or release noxious fumes. There is an ongoing list of laser safe materials here.
6. Close the lid on the laser cutter and press the green "Go" button on the machine.
For more information on the laser cutters, please see the section on Laser Cutting.
As always, if you have problems or questions about using the machines, don't hesitate to ask someone else. The Tulane MakerSpace is a student-run facility, and often there will be someone available who can help you with whatever questions you have.
Good Luck, and have fun!